Skip to main content

Vinyl fence posts go 30 to 36 inches deep in the St. Louis area, set in concrete over a 3 to 6 inch gravel base. The depth follows your local frost line, which averages about 30 inches here. Gate posts go deeper and wider than line posts, because they carry a swinging load every day.
That one measurement is what most vinyl fence installations get wrong, and it is why a fence leans within a few years instead of staying straight for decades. Too shallow and frost heave lifts the post. Everything else on this page assumes you got the holes right first.
Want it done for you? See how our vinyl fence installation works, or reach us at 636-464-1144 to set up a free on-site visit.
Why the Holes Decide the Fence
The holes decide the fence. Get the depth and the spacing right and a vinyl fence stays straight for decades. Get them wrong and no amount of care with the panels saves it.
We have been putting vinyl fence in the ground around St. Louis since 1994. This page is the order I work in, the same order as the six jobs below: layout, slope, holes, posts, panels, cleanup. The six jobs further down are real ones, with the footage, the gates and the days each took.
You can do this yourself with your own vinyl fence supplies, or have us install it.
Quick Summary for Installing a Vinyl Fence
- Plan ahead: Mark your fence layout, consult with neighbors, and obtain permits before digging.
- Evaluate your terrain: Identify slope and choose between racked or stepped fence installation.
- Dig correctly: Fence post holes should be 30″–36″ deep with a gravel base for drainage and frost protection.
- Reinforce gate posts: By using deeper, wider holes with added supports, such as rebar or pipe inserts.
- Set posts precisely: Use levels and string lines before pouring concrete to ensure plumb, aligned posts.
- Cut panels cleanly: Use proper tools and safety gear when trimming panels to fit slopes or tight spaces.
- Finish strong: Backfill, install post caps, check alignment, and clean up the site for a polished result.
How Many Fence Panels Do I Need?
How to Install a Vinyl Fence: Step by Step
Six steps, in the order I do them on a job:
- Mark the fence layout.
- Check the slope.
- Dig the post holes, deeper and wider for gates.
- Set the posts in concrete over gravel.
- Attach the panels, cutting to fit where the run needs it.
- Backfill, level and clean up.
Read all six before you start, because what you find in step two changes how deep you dig in step three.
Step 1. Marking the Fence Layout
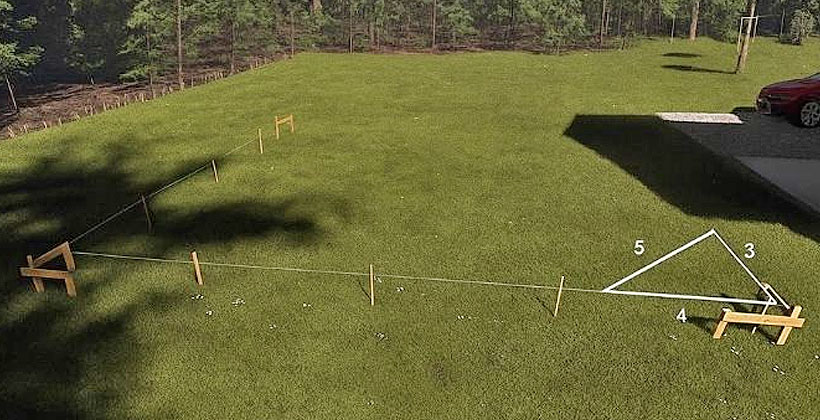
Objective: Define your fence line clearly to ensure accurate panel alignment, gate placement, and post spacing. Before digging a single hole, you need to have a well-planned layout. Proper marking helps you avoid installation errors that can throw off the entire fence line.
Step-by-Step Instructions:
- Start by identifying your property lines. Double-check with your plat map or property survey to ensure you’re not encroaching on a neighbor’s land.
- Mark the corners and gate openings first. Use wooden stakes or metal rebar at each corner post location and gate opening. These are your primary reference points.
- Run string lines between the stakes. Pull the string tight between corner posts to create a guide for the fence line. Make sure the string stays taut and level, this helps keep your fence straight.
- Use a tape measure to mark the location of each post. Measure according to your vinyl fence panel width (typically 6 or 8 feet). Mark each post position along the string line.
- Check your corners for accuracy. Check your corners with the 3-4-5 method. Measure 3 feet along one side and 4 feet along the other. If the diagonal between those marks is 5 feet, the corner is square.
- Mark each post hole precisely. Use spray paint or chalk to mark the center of each post hole. This ensures uniform hole spacing when you start digging.
Pro Tip: Lay out the entire fence line before digging any holes. This helps you visualize the layout and make adjustments before committing to post placement.
Step 2. Evaluate Ground Slope
Objective: Determine how terrain affects the placement of vinyl fence posts and the configuration of panels.
Understanding your landscape is crucial before installation. Uneven ground can significantly impact the appearance and performance of your fence over time. Taking the time to evaluate your slope now will save you significant headaches during the build.
Step-by-Step Instructions:
-
Stretch a string line along the planned fence run. Keep it tight between corner posts and about 6–12 inches above ground.
-
Use a line level or laser level to identify elevation changes along the string. This reveals how much slope you’re dealing with across each section of fence.
-
Walk the fence line and mark slope changes. Note where the ground rises or falls significantly between post locations.
Choose Your Slope Design Strategy:
-
Stepped Fence Design: Ideal for steep slopes. In this approach, each vinyl panel remains level, and posts are installed at varying heights to create a stair-step effect. This is the most common option for traditional vinyl panels that aren’t designed to flex.
-
Racked Fence Design: Best for gentle slopes. Here, the vinyl panels follow the contour of the land. Posts remain vertical, but the panels angle slightly to match the terrain. Not all vinyl fences can be racked, so this requires special panels.
Important: Most standard vinyl fence panels are not racked by default. Check with your manufacturer or supplier (like Maintenance-Free Outdoor Solutions) to confirm whether your style allows for racking or requires stepping.
-
For steep grades: You may need taller fence posts and may even need to custom-trim panels to maintain visual consistency and stability.

Step 3. Dig Post Holes (With Adjustments for Slope & Gates)
Objective: Dig stable, well-positioned holes that accommodate vinyl post type, terrain variations, and climate conditions for a long-lasting fence.
The success of your installation largely depends on how well you dig and prep your post holes. Inadequate depth or poor drainage are among the top reasons vinyl fences shift or lean over time, especially in freeze-thaw climates like St. Louis.
Standard Guidelines for Digging Vinyl Fence Post Holes
- Depth: Post holes should be 30–36 inches deep, depending on the local frost line. In the St. Louis area, the average frost depth is approximately 30 inches.
- Diameter: Line post holes: 8″–10″ wide and corner and end post holes: 10″–12″ wide for added strength
- Spacing: Measure 6′ to 8′ center-to-center, depending on your vinyl fence panel size and manufacturer recommendations.
- Drainage Layer: Add 3 to 6 inches of crushed gravel or stone at the bottom of each hole. It drains water away from the post and reduces frost heave, which is what keeps the post where you put it.
Adjusting Post Holes for Sloped Terrain
When installing a vinyl fence on uneven ground, the hole depth may need to be adjusted accordingly. Dig deeper holes on downhill runs so that the tops of all posts stay level along your string or laser line. Use a string line or laser level to guide height consistency across sloped areas. Whatever the slope, keep the bottom of every hole below the frost line. Some posts will need a deeper hole than the rest.
Pro Tip: On steep slopes, mark post tops in advance with painter’s tape to maintain a consistent visual line while setting posts.
Gate Post Installation: Stronger, Deeper, More Secure
Gate posts endure more force than any other part of your fence. Treat them like structural load-bearing supports.
- Hole Depth: Minimum of 36″–42″ deep, or deeper for large/heavy gates
- Diameter: 12″–14″ wide, and consider a bell-bottom shape to anchor against frost uplift and leverage
- Reinforcement Options:
- Steel pipe inserts or aluminum stiffeners inside vinyl gate posts
- Add vertical rebar into the concrete for extra strength
-
Concrete Requirements:
- Use high-strength or rapid-set concrete, avoid dry-packing (concrete must be thoroughly mixed)
- Let cure for at least 48 hours before attaching gate hardware
Pro Tip: Always install gate posts first, then build the fence outward. This ensures precise gate spacing and alignment for hardware and function.
Step 4. Set Fence Posts & Pouring Concrete
Objective: Secure each vinyl post in place with proper alignment, spacing, and support to ensure long-term durability and performance.
Once your post holes are dug and gravel bases installed, it’s time to set your fence posts in concrete. Precision here is critical, mistakes in leveling or spacing will impact the entire vinyl fence installation.
Setting Vinyl Fence Posts
- Place the post in the center of the hole: Use a level on two adjacent sides to ensure the post is perfectly plumb (vertically straight).
- Align post height using your string line or laser level: Post tops should be consistent along the entire fence run. Use temporary bracing if necessary to keep the posts in place during the pouring process.
- Confirm spacing between posts: Double-check your 6’–8′ center-to-center spacing per panel specs. Improper spacing can cause vinyl panels not to fit or result in excess stress on connectors.
Pouring Concrete for Vinyl Fence Posts
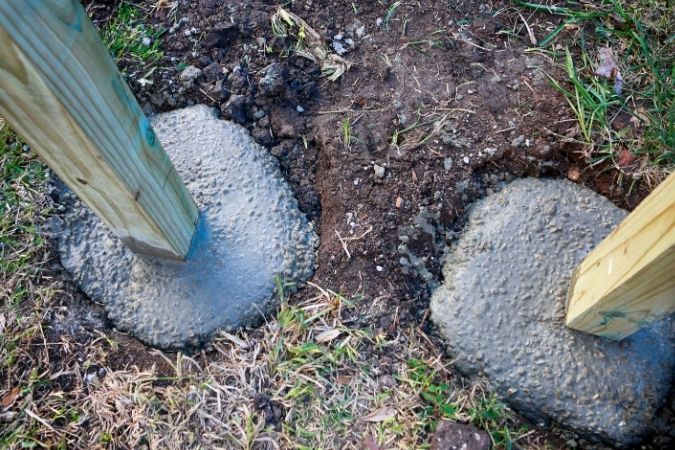
- Mix concrete thoroughly: Use pre-mixed high-strength or fast-setting concrete for best results. Avoid dry-packing; concrete should be pourable and well-mixed.
- Fill each hole to about 2 inches below ground level. This allows room to cover the top of the concrete with dirt or mulch for aesthetics and UV protection.
- Slope the top of the concrete away from the post: This helps shed water and prevents pooling around the base.
- Do NOT move the post once concrete is poured: Hold it steady (or brace) until the concrete sets. Misalignment after pouring can affect your entire fence line.
- Let the concrete cure fully.
- Standard concrete: allow 24–48 hours
- Rapid-set concrete: allow at least 1–2 hours before light handling (follow package instructions)
- Gate Post Reminder: As mentioned earlier, gate posts require deeper holes and stronger reinforcement. Always double-check alignment before the concrete sets, gate performance depends on it.
Pro Tip: Only install one or two posts at a time. Pour and level each before moving to the next. This ensures precision and avoids compounding errors.
Step 5. Attach Fence Panels
Objective: Secure vinyl fence panels between posts with proper alignment, structural integrity, and a clean, professional look.
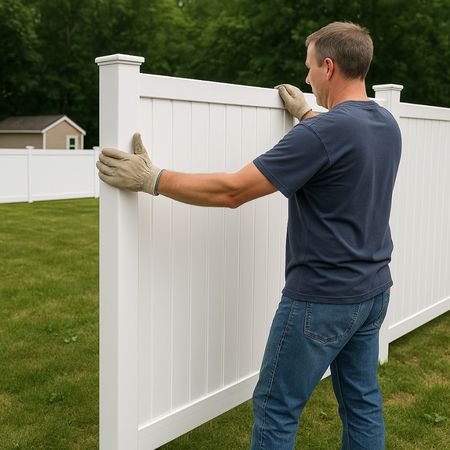
Once your posts are fully set and cured, it’s time to connect your fence line. Panel installation can vary slightly by product, so always refer to the manufacturer’s instructions, but these general guidelines apply to most vinyl fencing systems.
Standard Vinyl Fence Panel Installation
-
Insert panels into routed post holes or attach them with mounting brackets, depending on your fence design. Routed posts allow the panel rails to slide directly into the post. Bracketed systems require attaching the rails to the outside of the post using clips or brackets.
-
Use a level or string line to ensure each panel stays consistently level and aligned with the rest of the fence.
-
Check fit before fastening. Make sure panels are seated fully and evenly inside the posts or brackets before securing, especially on sloped terrain where one side may settle differently.
-
Fasten securely with rust-resistant screws. Use manufacturer-approved stainless steel fasteners to avoid corrosion over time. Avoid overtightening, which can crack vinyl.
Pro Tip: Work one panel at a time, checking spacing and level as you go. This helps catch misalignments early before they affect multiple sections.
Step 5b. Cut Vinyl Fence Panels to Fit (If Necessary)
Objective: Achieve a clean, safe, and professional finish when custom trimming panels for shorter sections, slopes, or obstacles.
Vinyl fence panels often require trimming at end runs, near buildings, or around unique features. Cutting correctly ensures both structural stability and curb appeal.
How to Cut Vinyl Fence Panels:
- Measure carefully. Measure the exact space between posts and subtract any necessary overlap (e.g., the depth of rails that fit into posts or brackets). Measure twice, cut once.
- Choose the right tools:
- Use a circular saw with a fine-tooth carbide blade or a power miter saw for straight, clean cuts.
- Use a jigsaw with a fine-toothed blade for notching around obstacles, such as tree roots, rocks, or retaining walls.
- Smooth the edges. After cutting, deburr with a file or sandpaper to remove sharp vinyl fragments and ensure a clean, finished look.
- Work on a stable surface. Set up a flat cutting area with clamps if necessary to secure panels during cutting.
- Use proper PPE. Always wear eye and ear protection when cutting, especially with power tools and synthetic materials like vinyl.
Pro Tips:
- Shorten panels from both ends to maintain symmetrical picket spacing when trimming full-length sections. This keeps the appearance balanced.
- Save your off-cuts. They’re perfect for:
- Test fitting brackets or rail angles
- Checking post spacing before final assembly
- Practicing cuts on slopes or unusual obstacles
Step 6. Final Adjustments and Cleanup
Objective: Ensure a polished, level, and secure finished fence, and leave your yard looking better than before.
You’re in the home stretch! Before calling the job done, it’s essential to inspect your entire installation and identify any minor issues thoroughly. Making small adjustments now can prevent long-term problems and enhance curb appeal.
Post-Installation Inspection
- Walk the entire fence line. Check for loose brackets or screws, panel gaps, or misaligned rails.
- Confirm that all posts are still level and that panels haven’t shifted during installation or curing.
- Trim post tops (if needed). If any posts are taller than necessary, trim them to a uniform height before adding caps.
- Use a fine-tooth saw and ensure clean, straight cuts.
- Install decorative post caps. Most vinyl fence post caps either snap into place or secure with adhesive.
- Choose styles that match your fence design, flat, gothic, solar-lit, or New England-style options are popular.
Backfill and Soil Compaction
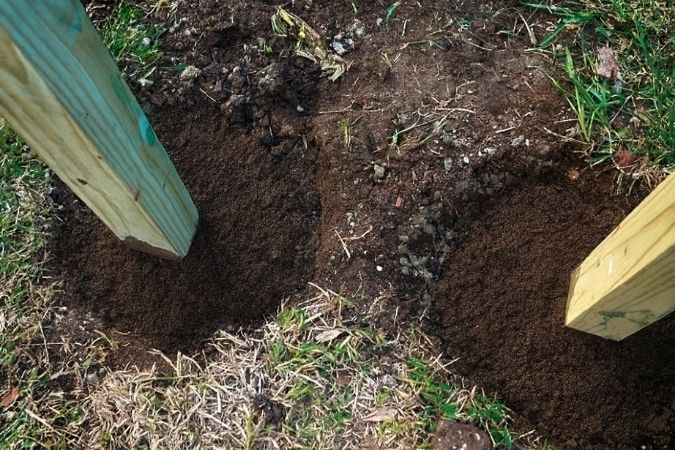
- Re-fill around each post base with soil (or gravel in erosion-prone areas).
- Use a tamper or the end of a 2×4 to compact the soil firmly around posts.
- This helps stabilize the fence and prevents it from shifting, especially on slopes or after rainfall.
Pro Tip: Slightly mound soil around each post to direct water runoff away from the base, a small detail that protects against pooling and frost heave.
Cleanup and Waste Removal
- Clean up all tools, packaging, and debris. Properly dispose of excess concrete, plastic wrap, brackets, or unused off-cuts.
- Sweep or blow off walkways and lawn to restore a neat jobsite.
-
Optional: Hose off panels to remove dust or scuff marks from handling. Vinyl is low-maintenance, but a quick rinse makes everything look brand new.
Six Vinyl Fences We Installed, and What Each One Took
Every one has its own page with before and after photographs, the footage and the number of days.
- Sumner, Barnhart – 5 June 2026. 531 linear feet of white vinyl split rail, 4 gates, 5 days. The old fence had chicken wire attached the whole way, and pulling it took most of the first day. Coronado 3-rail style.
- Emht, Imperial – 29 July 2026. 160 linear feet of white vinyl spaced picket fence for pet containment, 2 days. We laid the line out with the homeowner on day one and missed the neighbor’s sprinkler line.
- Weis, Fenton – 13 August 2026. 131 linear feet of white vinyl picket fence on a corner lot with a sloped double drive gate, 2 days. The homeowner showed us where two large trees had just come out, and we found roots in the digging path where they had stood.
- Bryant, Wildwood – 31 August 2026. 104 linear feet of 6-foot Supreme white vinyl privacy fence, replacing a 4-foot fence that gave no privacy once a pool went in, 2 days. We found the marked utilities far enough off the line that we did not have to hand dig.
- Harvengt, Collinsville – 1 May 2026. 84 linear feet of Artic Blend woodgrain vinyl privacy fence around a patio, 1 day. Separate sections kept the patio private without closing off the yard.
- Rogers, St. Louis – 25 June 2026. 61 linear feet of 6-foot white vinyl privacy fence, 2 gates, 2 days. The city hole inspection passed, and the old wood fence came out without damaging the landscaping.
Look at the range before you plan your weekend. 61 feet took two days and 531 feet took five, because removal, gates and slope drive the schedule more than footage does. We took two days on 104 feet, and we do this every day. Budget accordingly if it is your first fence.
Doing It Yourself, or Having It Done
If you are installing it yourself, we sell the panels, posts, gate hardware and concrete over the counter. The supply store is open to the public. The staff will check your post count and spacing before you load up. That check is free and takes ten minutes.
Where this guide stops. It covers flat to gently sloped yards with standard panels. It does not cover a fence on a retaining wall, a run inside a drainage easement, or anything needing engineered footings. Ask your building department about those, and ask us. Vinyl panels will not carry a gate: the gate posts carry that load, which is why they go deeper and wider than line posts.
Three situations mean the job is not for you: You cannot get 30 inches down by hand or with a rented auger. Your fence line runs along a main road or a sidewalk, where the city has to approve the height. Or your subdivision approves the style first. On the Wildwood job above, the height change needed city approval before anything was ordered. Any of those three stretches a weekend into a month.
When we do the install, the labor is guaranteed for a year, on top of the manufacturer’s warranty on the vinyl. We can usually get out to see your yard within 1 to 4 days. To see the panels and gates before you buy, visit our showroom in Arnold.
Would rather skip digging 30 holes yourself? Call 636-464-1144 or book a free estimate for vinyl fence installation.
That visit looks like this: we measure your line and bring a real panel out so you can see the style in person before deciding. You walk the layout with us, and nothing gets dug until you sign off on it. Most yards take 1 to 3 days. Read what homeowners say about their fences.
Either way, get the post depth right. It is the one step that cannot be corrected later without pulling the fence back out.
Vinyl Fence Installation FAQs
How deep should fence posts be?
30 to 36 inches in the St. Louis area, set in concrete over a 3 to 6 inch gravel base. The figure follows your local frost line, which averages about 30 inches here. Gate posts go deeper and wider than line posts because they carry a swinging load.
How far apart do vinyl fence posts go?
6 to 8 feet on center, measured post centre to post centre, depending on the panel size your manufacturer supplies. Measure the panel before you dig, not after.
How many days does a vinyl fence take?
Budget 2 to 5 days doing it yourself. We took 1 day on an 84-foot run and 5 days on 531 feet that included tearing out the old fence. Removal, gates and slope drive the schedule more than footage does.
Do I need a permit to install a vinyl fence?
Permits are set by your municipality, not by the state, and they differ across the St. Louis area. Ask your building department before you dig. Call 811 first either way, which is free and required.
Before You Start Digging
A vinyl fence is a weekend-and-a-half job when the holes are right. Mark the line. Check the slope. Dig to 30 inches. Set the posts in concrete over gravel. Everything after that is panels, and the panels we set are Catalyst, made by Barrette Outdoor Living. We are listed on their installer directory.